Well it's Friday and I am at home enjoying some creative time, watching shows on Netflix and churning out some minis. I've stopped at the craft store recently and got some good stuff. :)
#1: I found some watch faces on clearance and bought one to hang in the Glencroft.I painted the edges with enamel paint, and soon will hang it on the wall...either in the living room or kitchen.
And yes, you're looking through a magnifying lens there, which is part of my brand new Ott Lite. :-D Michael's had them for 40% off so I picked up the LED magnifying lamp. PERFECT for minis!!
It has interchangeable lenses and the gooseneck piece can be clipped onto a surface.
I also picked up some Modge Podge Dimensional Magic. I am trying it out to see how it works in place of resin so I can make mini drinks and foods that have liquid (stews, etc.).
I made a little cup of coffee by mixing the Dimensional Magic with acrylic paint. I am still waiting for it to set.
I also made another screen...I think I am getting a method down. :)
And last, I started on a rose kit. I made my first rose Wednesday night. It took a while to get the first one done, but I like how it looks.
That's all for now. I am just waiting for the announcement of the Greenleaf Spring Fling to see what cool stuff they've cooked up for this contest. I do love the additions so far!
About this blog:
Friday, March 30, 2012
Monday, March 26, 2012
Organization and new light!
I have given a tip on how to use those Tim Holtz Configurations boxes in this post. I found mine at a Tuesday Morning for about 5 bucks, and still have most of the boxes left. So, I cleaned out my mini drawers to see what I had left after filling up the Glencroft. I decided to store them in the boxes so I could see immediately what I have. I'll likely go back to Tuesday morning and see if they have any more of these at some point, because I am not completely done organizing my minis.
Here's what I do have so far:
I think it's good for inspiration as I can see what I have at a glance, and maybe get inspired to use some of the objects in there.
I also had the problem of misplacing tools around my work area, so I went to Target and bought a toolbox for 5.00 and put all of tools in there: clamps, EZ cutter, saws, stylus, glues, sandpapers, etc. This way, when I travel, I can still bring my tools to work on minis!
In other news, a battery-operated light I ordered from HBS.com came today. I really like these as I can have light in my unwired Glencroft. I am planning on learning how to wire my next project (which might be the Greenleaf Spring Fling project, depending on what the kit turns out to be).
Here's the light which goes well in the kitchen:
These lights are quite convenient, not terribly expensive, and they add a touch of realism to the rooms. Now that I know these fit well in the house, I'll have to choose styles for the other rooms. :)
Wednesday, March 21, 2012
Monday, March 19, 2012
Sunday, March 18, 2012
Desk goodies and more!
I was in New Hampshire again today and stopped in at Earth N Tree. It's a great reward for all of the traveling and the field work (which is the reason I go to NH in the first place). I bought some goodies, which I will be sharing as I work on each of the rooms. :)
Tonight I did some work on the desk in the bedroom and added some details, including a trash can with trash. :) I am loving how it turned out.
dale's dreams a couple of days ago and received my order when I got back in town today! She's quick!! And she threw in some lovely goodies in addition to the beautiful pillows I ordered. :) I love her stuff and I recommend that you check out her etsy shop (poke the link above) if you are looking for decor for your dollhouse. Her pillows are lovely. :) See for yourself:
Hope everyone is having a lovely day and are feeling inspired! I am sure there's more to come soon. :)
Friday, March 16, 2012
Things I've made tonight...
I tried making my first cupcakes tonight. They're not perfect, but not terrible for my first try. :)
I want to try different flavors and add some toppings in the future, but these were fun to do. The "dish" they are sitting on is a jewelry finding from the craft store.
I also made up some plants for the Glencroft. I had bought a few things from Joann's recently that would make some quick and easy plants.
On the left are some dried ferns which I separated, cut and attached to cloth-covered wire to make a smaller fern plant. On the right are some really cool embellishments I found in the scrapbooking aisle. The top one I hung on the herb shop door to decorate for spring. The one on the bottom was placed into a vase I had on hand. You can see the finished plants below.
Here they are in the Glencroft:
Plants do add some life to a scene.
Currently, I am still working on the details and I am going to focus on the bedroom next. I think I am going to repaint and redress the bed and add some stationery to the desk. I just found a little handpainted chest of drawers in my collection that fits the color scheme in the bedroom.
That's all for now. I am going to be quite busy in the next couple of days, so I don't know how much crafty stuff/blogging I'll get to do, but I am glad I had some time over the last few days to do some artsy stuff. It's a nice relaxing break from the usual...
Wednesday, March 14, 2012
Tuesday, March 13, 2012
Glencroft bathroom
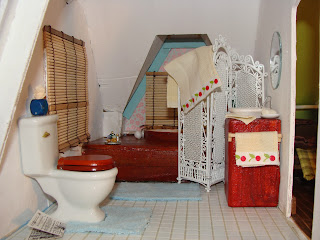
So I took today to work on some finer details. I am going to go room by room as I do this (to focus my energy on one thing at a time and to not distract myself too much!). So today I worked on the bathroom. Here's what it looks like now:
You can compare this with my post from a couple days ago here.
Highlights include: new sink, repainted bathtub, new bath mats, towels, and a new screen.
First, the sink:
How I did it:
Well, I wanted a modern sink that matched the bathtub that I also made (with a Japanese flair), so I looked through my stash to see what I had. Luckily, I had been to a Tuesday Morning recently and grabbed one of these Tim Holtz Configurations boxes (for $4.99!). As you can see, it's one big box with a bunch of little boxes inside that you can use for multimedia projects. I wrapped one of those smaller boxes (that had just the right dimensions for a sink - these are lovely "to scale" pieces) in masking tape. Then I painted it in an acrylic color called "Transparent Red Oxide" which gives that great reddish tint. I had done the same to the bathtub too.
I poked a hole close to the open side of the box to fit a bent paper clip through for the faucet. The bowl of the sink is a wooden mini bowl painted with white acrylic and glossed with varnish until it shines. The "drain" is a piece of brass metal tape that I cut out with a hole punch. I drew in the lines around the drain with an artist marker. As you can see the open side of the box is against the wall. If you wanted, you could add a door or shelves and leave that part exposed. Perhaps even a little curtain across the front could work too, depending on your decor style.
I also added a little towel bar on the side, too. :)
As you can see I did make some towels for the bathroom. I had some linen napkins in my stash that I had found at an antique store and cut one into the correct dimensions for a towel, hand towel and washcloth. I edged the bath and hand towels with some cute ribbon I had on hand.
I also made a bath mat and toilet rug:
Those were simple as I cut up an old kitchen towel we had, but no longer use. It gave that "shaggy" texture that, to me at least, seems right to scale.
Also, as you can see above, I replaced the Asian screen with a lighter, smaller screen that fits in well. I loved the other one, but with the sink installed, it didn't fit in the room. I will definitely be using it in another room or another project.
And, yes, I finally gave this house a door! :) You can see the results below - indoors and out. :)
(PS: I am sorry I didn't post pictures of the sink as I went. :) I really wasn't sure how it was going to turn out. But if anyone is interested, perhaps I could make a photo/video tutorial.)
Saturday, March 10, 2012
Furnishing and decorating the Glencroft
Here are pictures of the interior of the Glencroft. There's a lot more to add (e.g., a sink in the bathroom), but I like how it's coming together. :)
As you can see, I still need to put on the front door! It's a little drafty in there! I am going to clean my own house first and put the Glencroft on display in the foyer. Then I am going to make the door and attach it soon - maybe tomorrow? We'll see. :) But I am excited with getting this done. Now I can work on all of the tiny details... :)
 |
| I love this screen, but I am not sure if it's going to stay here. The sink is going to go against the wall where the screen is now. |
 |
| The wall decorations are beads from the craft store. The tiny cat shelf came from Earth and Tree in Amherst, NH. |
As you can see, I still need to put on the front door! It's a little drafty in there! I am going to clean my own house first and put the Glencroft on display in the foyer. Then I am going to make the door and attach it soon - maybe tomorrow? We'll see. :) But I am excited with getting this done. Now I can work on all of the tiny details... :)
Thursday, March 8, 2012
Chimney finished...(I think!)
Happy International Women's Day (and happy birthday to my sister)!
Today was absolutely gorgeous in upstate NY. We had some overcast skies but the temperature was perfect and it smelled all earthy and springlike outside.
I added the mortar to the chimney, which made it look like this:
Then I painted over the mortar to give it that stucco effect. Here's what it looks like now. The paint isn't completely dry in the picture below, so it's a little shiny.
Excuse my messy craft table. :)
Anyway, I am now going to touch up the paint in the living room so I can start decorating. :)
Wednesday, March 7, 2012
Chimney progress
I added the Paperclay to my chimney tonight. It will need to dry overnight before I add the mortar, but I am already pleased with how it looks.
I can't wait til it's all done because I am really looking forward to decorating the inside. :) I just I picked up these cute pillows (when HBS had their 50% MMD minis) which match the house. Hopefully tomorrow I'll have some time after work to add the mortar, paint the chimney and finish any touchups before I add the front door (to hinge or not to hinge...that is the question).
I can't wait til it's all done because I am really looking forward to decorating the inside. :) I just I picked up these cute pillows (when HBS had their 50% MMD minis) which match the house. Hopefully tomorrow I'll have some time after work to add the mortar, paint the chimney and finish any touchups before I add the front door (to hinge or not to hinge...that is the question).
Monday, March 5, 2012
Shingling done...and more progress
Today was a trying day, but I came home to Jay waiting in the car to take me out for a nice dinner.That made things better.
When I got home I attacked the Glencroft with stain, varnish, paint and then decided to start the chimney. Why not? So here are some pictures from that experience. I probably won't get to do anything with it again until Wednesday (at the soonest) since I am working late tomorrow, but I am happy since I got further than I planned today.
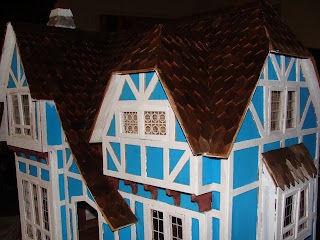
The stained (and varnished) shingles:
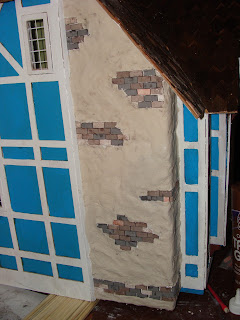
The bottom of the chimney is in progress. I am adding bricks in patches, then I am going to fill in the rest with paperclay, and add mortar as I did above. I will paint over the mortar-covered paperclay with the white paint so it looks as if the bricks have been partially stuccoed-over.
Can't wait to finish!! All I have left is the front door....
When I got home I attacked the Glencroft with stain, varnish, paint and then decided to start the chimney. Why not? So here are some pictures from that experience. I probably won't get to do anything with it again until Wednesday (at the soonest) since I am working late tomorrow, but I am happy since I got further than I planned today.
The stained (and varnished) shingles:
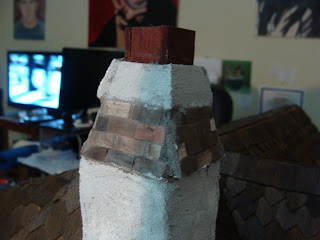
Below is the top of the chimney. I added bricks to the middle section, and some paperclay to the chimney section below the bricks and above the roofline. Then, I took mortar and spread it over all of the top of the chimney (except for the very top). I took a wet cloth and removed the mortar from the bricks' surfaces and then let the rest dry. Once it dried, I went over it with white acrylic paint. And now it has a cool stucco effect.
The bottom of the chimney is in progress. I am adding bricks in patches, then I am going to fill in the rest with paperclay, and add mortar as I did above. I will paint over the mortar-covered paperclay with the white paint so it looks as if the bricks have been partially stuccoed-over.
Can't wait to finish!! All I have left is the front door....
Subscribe to:
Posts (Atom)


