Hi everyone! Sorry, I have not fallen off the face of the earth, just the blogosphere! lol Anyway, just putting it out there that I have posted some dollhouse items on eBay in a lot. We just moved to a new apartment and I did some purging in the process.
Hopefully there's something here you like!
Dollhouse miniature lot
Hope all is well, readers. I hope to pose some new and interesting things soon!!!

Friday, October 18, 2013
Wednesday, July 3, 2013
Shop update and other things!
I've been pretty busy doing several things over the past few weeks and just realized it's been a while since I posted here! And, yikes, I have some reading to catch up on to see what's happening in all of the blogs I've been following!
Hmmm, what has happened since the last time I posted?
- Well, I have been working on a swap with Faby via Jazzi's Christmas in July Swap! We've received each other's gifts and I will be posting real soon! (I still have to take photos!)
- I also participated in a second swap with Mini*Aesthetics who was interested in my dollhouse quilt and I made one for her. Pics will be coming once that swap is complete!
By the way, if you see anything you like on my blog or in my Etsy shop and want to do a swap or trade, I am very open to it!!! :)
- I have been taking up quilting (in 1:1 scale!!!). I made a quilt for our couch - slightly smaller than twin size - to use up excess fabric in my stash. I will post some photos of that, too! (I have a lot of pics to post!!!)
And that's only craft stuff, and doesn't account for work (in which a nice personal accomplishment was made) or day-to-day stuff. This summer is a busy one.
Our Etsy shop will be going on vacation from July 9 - 19. I am happy to announce that I will be doing a sale from NOW until Monday, July 8 at 5PM EST. Use the coupon code July42013 to receive 25% off your order before then! (Here's the link: https://www.etsy.com/shop/LindasMinis)
Hope everyone is doing well, and for those of you who are experiencing any heat waves are staying cool!
Cheers,
Linda
Friday, June 21, 2013
Tote bags are now in my Etsy store!
I got several positive responses for my tote bag I made yesterday, so I made a few more. I added two to my Etsy store!
I really enjoyed making these (and yes, they do open and you can put stuff inside!). If they sell, I will make more. I also take custom orders on my site, if one wants a specific color or extra flourish (like the flower I added in the tote I posted yesterday); just click "Request Custom Order" on the left-hand side of my store's page.
 |
| Click here to go to my Etsy site |
 | |
| Click here to go to my Etsy site |
Thursday, June 20, 2013
Follow-up and update on Pam, the doll

Pam is all dressed up! Not terrible for my first go at
dressing a doll (if I say so myself!). And those of you who commented on my
last post, thank you! As you mentioned, fabric glue is LOVELY when making dolls'
clothes in this scale. I did use the sewing machine on Pam's skirt, but fabric
glue took care of the more fiddly sleeves and bodice. I used Beacon Adhesives
Fabri-Tac. I love this stuff as it quickly dries so there is not much waiting
between steps of a project.

Also to answer a question from Iris March, the doll was made
from a Teresa Glisson mold and painted by Jan Hughes (who sold me the doll).
Her eBay page is here in case any of you are interested. (Her shipping was SUPER fast!)
If you noticed, I put Pam's hair up. I like it better that way. She looks quite elegant (and ready to meet her new neighbors!)


I will be doing a photo shoot soon of Pam in the Glencroft, historical society, and herb shop soon. Stay tuned!
Wednesday, June 19, 2013
Say hi to Pam!
Well, I think I found a resident for the Glencroft. Pam arrived today (from California!) thanks to a kind seller on eBay. I saw her (perhaps through Small Stuff? I can't remember...) and thought she kinda resembled the character Pam (played by Jenna Fischer) from one of my favorite shows, The Office. Maybe just a little. Anyway here she is!

She arrived in New York without any clothes (oops?) so I am getting her outfitted and trying my best at designing clothes for her. This is my first time trying to make realistic doll clothing for an actual doll (don't tell her that) so this will be interesting. For now I have outfitted her in a slip and a tube top.


She did come with her shoes, though! They're so pretty!

So I have sorted through my fabrics and picked out a few favorites...
 I am going for modern (with some retro flair - like this awesome dress!). There are quite a few options here, but I am looking at the stripes...

...or the blue floral print. Both would be super cute! So, I am going to learn how to design a dress pattern and make a dress. Might be good practice as I really want to make my own clothes sometime soon! (My sewing machine and I have a real hot/cold relationship...I love it when it behaves, but occasionally it rebels. I am sure it's due to user error, though. I'm still learning the ropes!)
Anyway, what do you think..stripes (navy blue, they are on the left in the above picture) or the blue floral?
I am excited to get her dressed so she can "meet" Oscar, Esmerelda, and Stanley. I'll document her visit to the herbal shop, the historical society, and finally her move-in to the Glencroft! I can't wait!

She arrived in New York without any clothes (oops?) so I am getting her outfitted and trying my best at designing clothes for her. This is my first time trying to make realistic doll clothing for an actual doll (don't tell her that) so this will be interesting. For now I have outfitted her in a slip and a tube top.


She did come with her shoes, though! They're so pretty!

So I have sorted through my fabrics and picked out a few favorites...


...or the blue floral print. Both would be super cute! So, I am going to learn how to design a dress pattern and make a dress. Might be good practice as I really want to make my own clothes sometime soon! (My sewing machine and I have a real hot/cold relationship...I love it when it behaves, but occasionally it rebels. I am sure it's due to user error, though. I'm still learning the ropes!)
Anyway, what do you think..stripes (navy blue, they are on the left in the above picture) or the blue floral?
I am excited to get her dressed so she can "meet" Oscar, Esmerelda, and Stanley. I'll document her visit to the herbal shop, the historical society, and finally her move-in to the Glencroft! I can't wait!
Sunday, June 16, 2013
Quilt update!
Well, I finished my first dollhouse quilt. Even with using the sewing machine, it was quite the venture. In fact, using a sewing machine probably upped the difficulty level a bit, since I had a 1/8" seam allowance. Hmmm. I might just make those pieces wider next time. ;)
Anyway, here is how it turned out.
 The top of the quilt. I am pretty happy with this. The binding is a bit too wide, so I will definitely change that for the next quilt (and there will be a next quilt!)
 This is the back. I'm not crazy about it, but I had LOTS of this fabric in my stash and wanted to use it. My sewing machine was being a pain too, so the stitches were less than awesome on this side. I still need to trim some stray threads.
This is how it looks on a bed. It fits a dollhouse scale full bed.
 It does look good on the bed, so I am pretty happy with that! This quilt is one I will keep, but I will hopefully be designing and making some more for the shop once I get a good method down. :-)
Lessons learned:
1) Hand sewing may actually be better for tiny stitches.
2) Skinny binding will look better in this scale. (And maybe darker for this particular quilt, though I like it when it's on the bed.)
3) Patience is required!
4) I can make tiny quilts! :-D
Anyway, here is how it turned out.


This is how it looks on a bed. It fits a dollhouse scale full bed.

Lessons learned:
1) Hand sewing may actually be better for tiny stitches.
2) Skinny binding will look better in this scale. (And maybe darker for this particular quilt, though I like it when it's on the bed.)
3) Patience is required!
4) I can make tiny quilts! :-D
Saturday, June 15, 2013
Dollhouse quilts
Enjoying a beautiful day today! It's also been a week since I got married and I am very much enjoying it! (Our honeymoon is in July.)
I've been doing little crafting lately, but am happy to share something I just started making - a dollhouse quilt. This isn't easy and I am not using any tutorials to make one. (But, maybe I'll make a tutorial if this turns out okay!)
I found a bag of tiny fabric scraps in our storage unit a few weeks ago when we were looking for a couple other items. I brought it back to the craft desk and set it aside until I decided to make a tiny quilt. I have a real-life lap quilt that I made last year out of African fabric and I am hoping to make one that (somewhat) matches.
I started on it yesterday. First I cut pieces of the fabric (they were in 2 inch x 2 inch squares) into 2 inch by 1/2 inch strips. I then sewed together different patterns with a 1/8" seam allowance.
This is what I have so far:

I am going to join these together so there will be sets of 4 strips. Then I am going to find a solid color in my stash and join the 4 patterned strips to a strip of solid color then to another strip of four and then continue this until I get the desired length of quilt. Then I will probably cut this in half so the strips are 1" wide. That might look better. We will see!
As you can see, I cut and sewed quite a bit yesterday.

This is a pile of strips pinned together. I just need to sew them to get a group of four strips. :) Now, to raid my stash for a solid color. :-)
I'll keep you all updated about how this works out!
Monday, June 3, 2013
Hutches and pottery
I have a lot of extraneous minis. I am not sure if that is a good or bad thing, but recently, I was going through the extra pieces I had (which I keep displayed on a shelf in our living room) and decided to reorganize and maybe even pare down some of it.
I don't know if you remember that shadow box display of pottery I put together a while back. (It's here.) Well, the hutch in that shadowbox has two matching pieces. Interestingly, I got all three of them from different places, but they look like they were made by the same person/company. I decided to put all three of them in the shadowbox, with the pottery, and I even added a small enamel pot with forsythia, too.
Someday, I will hang this somewhere. For now, it sits on the table in our foyer.

Sunday, June 2, 2013
Updated Herb Shop - just some pics :)
 |
| I added a new shelf unit (found at an antique store) for all of the herbs and accessories. |
 | ||||
| There are jars of all sizes, a basket full of seed packets, and some growing plants. Also, there's a mortar and pestle, canisters, and even some shopping bags on the bottom shelf. The cork on the shelves was added by me so the objects on the shelf were more stable. |

 |
| Crystal balls and antique pottery in the display case. |
 |
| I rearranged this shelf quite a bit and put the hats on top. I would like to add more items. |
 |
| Bowls of stickers, a selection of gems, and Mexican tapestries. |
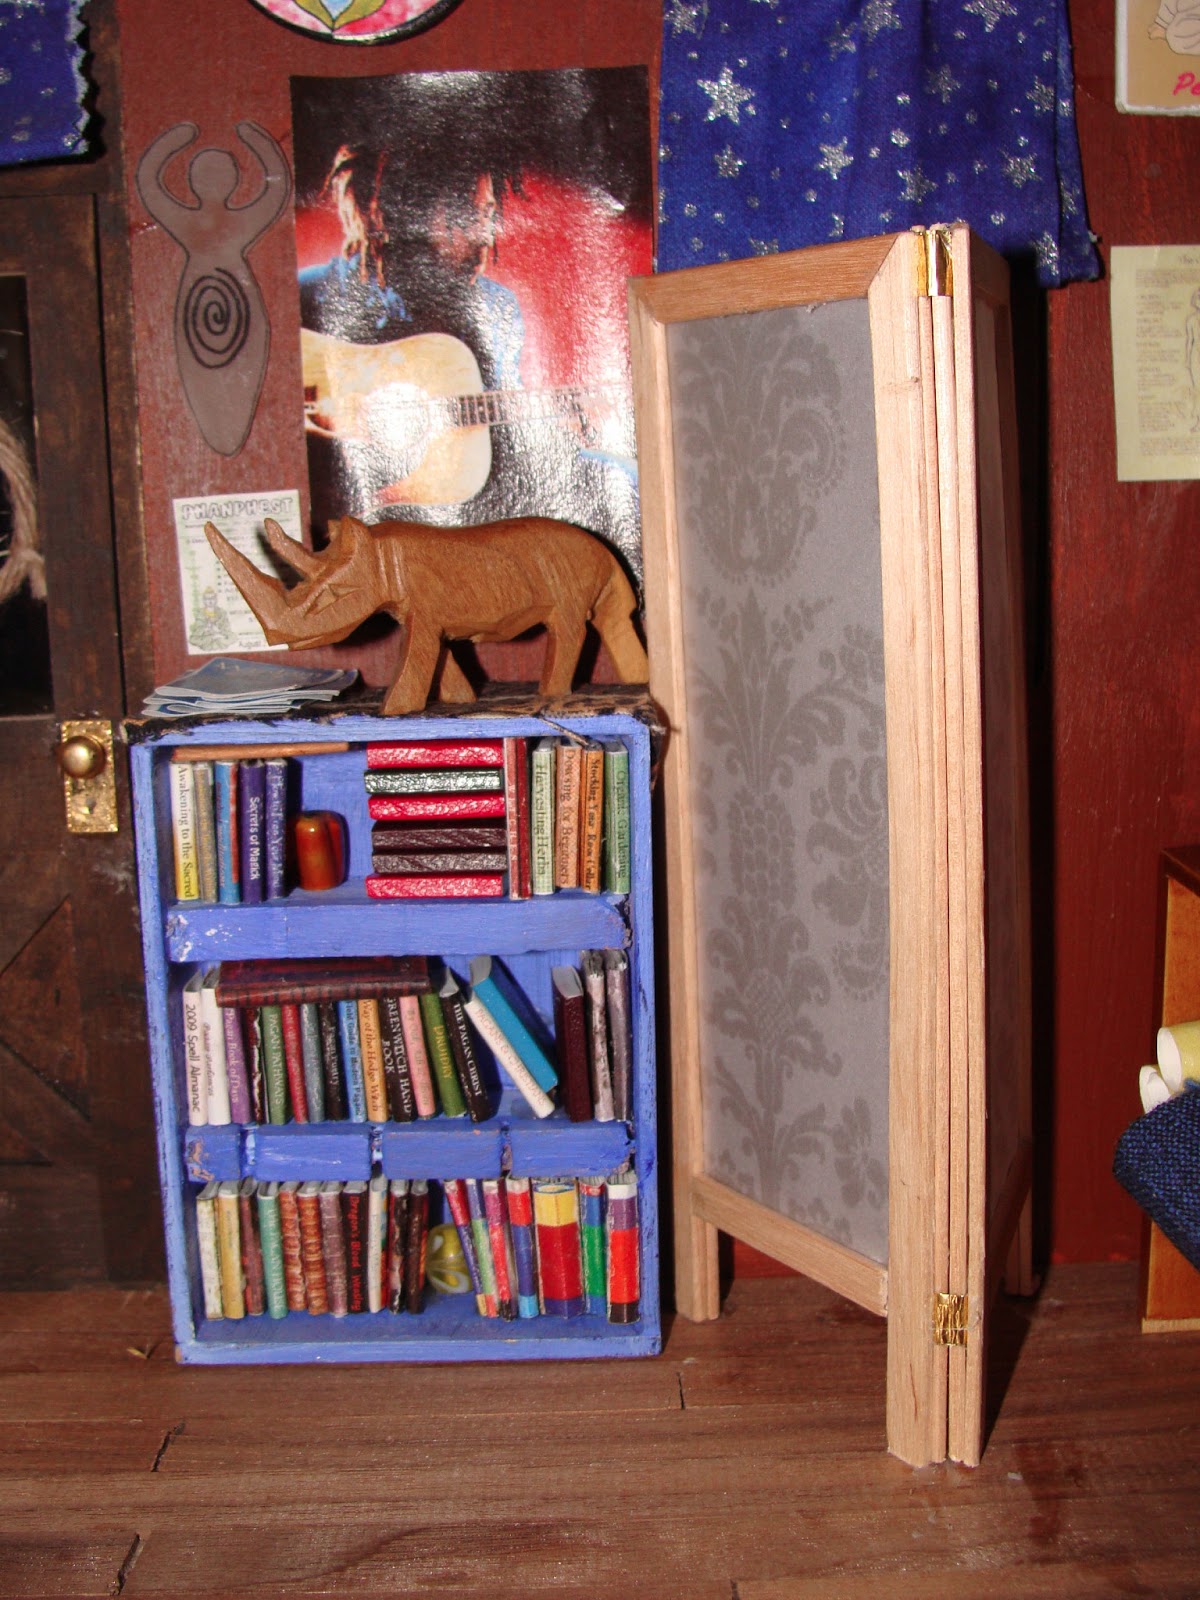 |
| My homemade bookshelf and screen, with a cute wooden carved rhino. |
 |
| This shop is my first miniature project and I've enjoyed putting it together. Adding and moving things around means a project is never *quite* complete, and I like that! |
 |
| Looking over some posters. |
 |
| A book I put together from a kit. I love the details on this. |
 |
| A better view of the shelves. |


 |
| I made this hex sign from a brochure I picked up while in Lancaster, PA. |
 |
| I thought this picture turned out pretty cool. :) Here, you're looking through the front door of the shop. |
 |
| I just *love* this log with toadstools. I bought it from Earth and Tree a little over a year ago. :) |
Monday, May 27, 2013
Wedding bells! (and Etsy sales!)
So, I don't know if I mentioned this too much, but I am getting married on June 8th! It's coming super-fast and I am quite excited.
We are trying to take an eco-friendly, DIY approach as much as possible. I even made my own bouquet! Here's a peek...
 Those are ribbon roses and flowers. It took forever to make but it was totally worth it as I know it will last a very long time. I made two more, smaller, ones for my maid of honor and bridesmaid. :) I am planning on making a wrist corsage that matches for my mom, too.
As we are going away for the wedding, I will be putting my Etsy shop on vacation (from June 4-11). BUT, I wanted to give a little gift to all of you, so from now until June 3, you will get 30% in my shop if you use the coupon code WEDDING2013.
I will be posting a few more times before the wedding. I have been re-organizing some of the houses and perhaps I will do another book review, time permitting.
Hope all of you are doing well!
Cheers,
Linda
We are trying to take an eco-friendly, DIY approach as much as possible. I even made my own bouquet! Here's a peek...

As we are going away for the wedding, I will be putting my Etsy shop on vacation (from June 4-11). BUT, I wanted to give a little gift to all of you, so from now until June 3, you will get 30% in my shop if you use the coupon code WEDDING2013.
I will be posting a few more times before the wedding. I have been re-organizing some of the houses and perhaps I will do another book review, time permitting.
Hope all of you are doing well!
Cheers,
Linda
Friday, May 24, 2013
Happy Birthday, Bob Dylan!
Bob Dylan turns 72 today, so I decided to do some art in his honor:
Mid-70s era Bob Dylan
Cartoon of "Subterranean Homesick Blues" Dylan
Enjoy and have a lovely day!
Cheers,
Linda
(Adding to A Favorite Thing)
Mid-70s era Bob Dylan
 | |||
| In pencil... |
Cartoon of "Subterranean Homesick Blues" Dylan
 | ||||||||
| Pen, colored pencil, ATC |
Enjoy and have a lovely day!
Cheers,
Linda
(Adding to A Favorite Thing)
Sunday, May 19, 2013
Book Review and Owls!!!
-->

The instructions are quite clear. There are some great photographs and diagrams. You can use tracing paper to copy the patterns so you can use them again and again!

Hi there! On my facebook page, I had asked folks if they'd be interested in reading book reviews on my blog. I did receive some positive responses, so I thought I'd start with a very fun selection from my bookshelf called Microcrafts.

This colorful book details 25+ projects you can make using
scraps in your craft stash. I am all about using up materials and letting very
little, if any, go to waste. This book is great for giving you ideas on how to
do that! Imagine having a "crafternoon" or a rainy day where you
wanted to create but didn't want to start a "big" project. This book
is perfect for that situation. It would also be fun to share with a younger
craft fan as well! There are lots of simple projects
(bunting, for example) but also some more complicated projects (mini books)
that will take some more time and patience.
 |
| Back of the book... |
As a miniaturist, I find this book a great source for ideas
for my dollhouses (in 1/12 scale). Books, bunting, miniature candy, deer heads,
houseplants (including macramé plant holders!), and birdfeeders are just a few of
the projects that are directly applicable to the miniaturist hobby. However, it
is easy to adapt any of the projects for a dollhouse scene. For example, I made
one of the little fabric owls (shown below) and decided (by mistake, actually)
that they would make super cute pillows! Perfect for a 1/12 scale scene!
 |
| I made this little guy using the instructions in the book! Super cute. The ribbon can be used to hang him from just about anything. |
 |
| The little guy on the right was my first attempt at the owl project in the book and he turned out too short to look right, so I made him into a pillow, which is perfect. The little guy on the left is the third one I made (I got a bit carried away in making these! -___-;) |
(By the way, the chairs above can be found in my Etsy shop here.)
A special bonus in this book is the appendix, which includes information about supplies needed in projects within the book as well as various basic craft techniques. The latter include stitches to help you complete the projects and actually make the book a great crafter's reference as well! I also enjoy the modification ideas and the information about the contributors also found in the appendix.
Sometimes you just need to create something cute, frivolous,
and fun, and this book is a great guide in helping you do that, and in helping
you use up some of your scraps! These projects are fine for small thoughtful gifts, trinkets, or club projects for young and not-so-young alike! I highly recommend this book.
If you have read
this book, or decide to based on my review, please comment and let me know your
thoughts!
Book details:
Title: Microcrafts: tiny treasures to make and share
Editors: Margaret McGuire, Alicia Kachmar, Katie Hatz, and Friends
Publisher: Quirk Books, Philadelphia 2011
87 pp
Retail price: 16.95 US/18.95 Canada (hardcover)
Book details:
Title: Microcrafts: tiny treasures to make and share
Editors: Margaret McGuire, Alicia Kachmar, Katie Hatz, and Friends
Publisher: Quirk Books, Philadelphia 2011
87 pp
Retail price: 16.95 US/18.95 Canada (hardcover)
Please buy from your local and/or independent bookstores!
Here is where you can find Microcrafts
online or near you: http://www.indiebound.org/book/9781594745218
Note: I am in no way affiliated with the authors or
publisher of this book, nor have I been compensated for this review. This
review is merely to express my opinions of the book and my experience using
their instructions!
--------------------------------------------------------------------------------------------
I also wanted to share with you the finished owl pillows I made from two kits I purchased from Whimsy Cottage Minis!
So cute!

Thursday, May 16, 2013
Roadside America!
Last weekend, my fiancé and I needed to go to Lancaster, PA for some wedding stuff (including cake tasting!). On the way back to NY, we stopped by one of the places I went to when I was about 8 years old - Roadside America in Shartlesville, PA. It's right off of I-78. Here is their website: http://www.roadsideamericainc.com/.
I thought I would share with you some pictures as I remember how exciting this was when I was 8 and it's still pretty cool about 25 years later. :) (Photo credit goes to my fiancé, who, unlike me, remembered to bring his camera in!)


I thought I would share with you some pictures as I remember how exciting this was when I was 8 and it's still pretty cool about 25 years later. :) (Photo credit goes to my fiancé, who, unlike me, remembered to bring his camera in!)


Saturday, April 20, 2013
Coat hook for a dollhouse?
Hi everyone!
I want to share with you something I have been working on and maybe get some ideas. I don't know if this will be something that ends up in the Etsy shop or what, but I was playing around the other day and made this:
 It's about 1 1/8" at its longest. I think it would make an adorable little coat hook in a shabby chic cottage! (Or maybe fancy curtain rod hooks?)
I got these little resin pieces from a shop online (I think it was Beady Bom Bom creations, but she closed her store) and they have been sitting in my craft area for a while trying to figure out what they wanted to be.
 I had bought some clip-on earring findings at the craft store as I remember reading about their many potential uses in several places throughout the mini craft world. Well, I was playing around with it and got the hook above (on the left). There's a little hook on these which needs to be cut and filed off (I should pick up some metal files) for a smooth edge, but they are relatively easy to work with.
Here are the specific earring backings that I picked up (at Michael's):


I might make more of these and maybe even do a tutorial if someone is interested. They are exceptionally cute!
Oh, I also added some new stuff to the Etsy shop today (including the cinnamon rolls!) so please check it out here.
I want to share with you something I have been working on and maybe get some ideas. I don't know if this will be something that ends up in the Etsy shop or what, but I was playing around the other day and made this:

I got these little resin pieces from a shop online (I think it was Beady Bom Bom creations, but she closed her store) and they have been sitting in my craft area for a while trying to figure out what they wanted to be.

Here are the specific earring backings that I picked up (at Michael's):


I might make more of these and maybe even do a tutorial if someone is interested. They are exceptionally cute!
Oh, I also added some new stuff to the Etsy shop today (including the cinnamon rolls!) so please check it out here.
Subscribe to:
Posts (Atom)